The disaster flight that taught me the best packing method, and how to prepare for the worst.
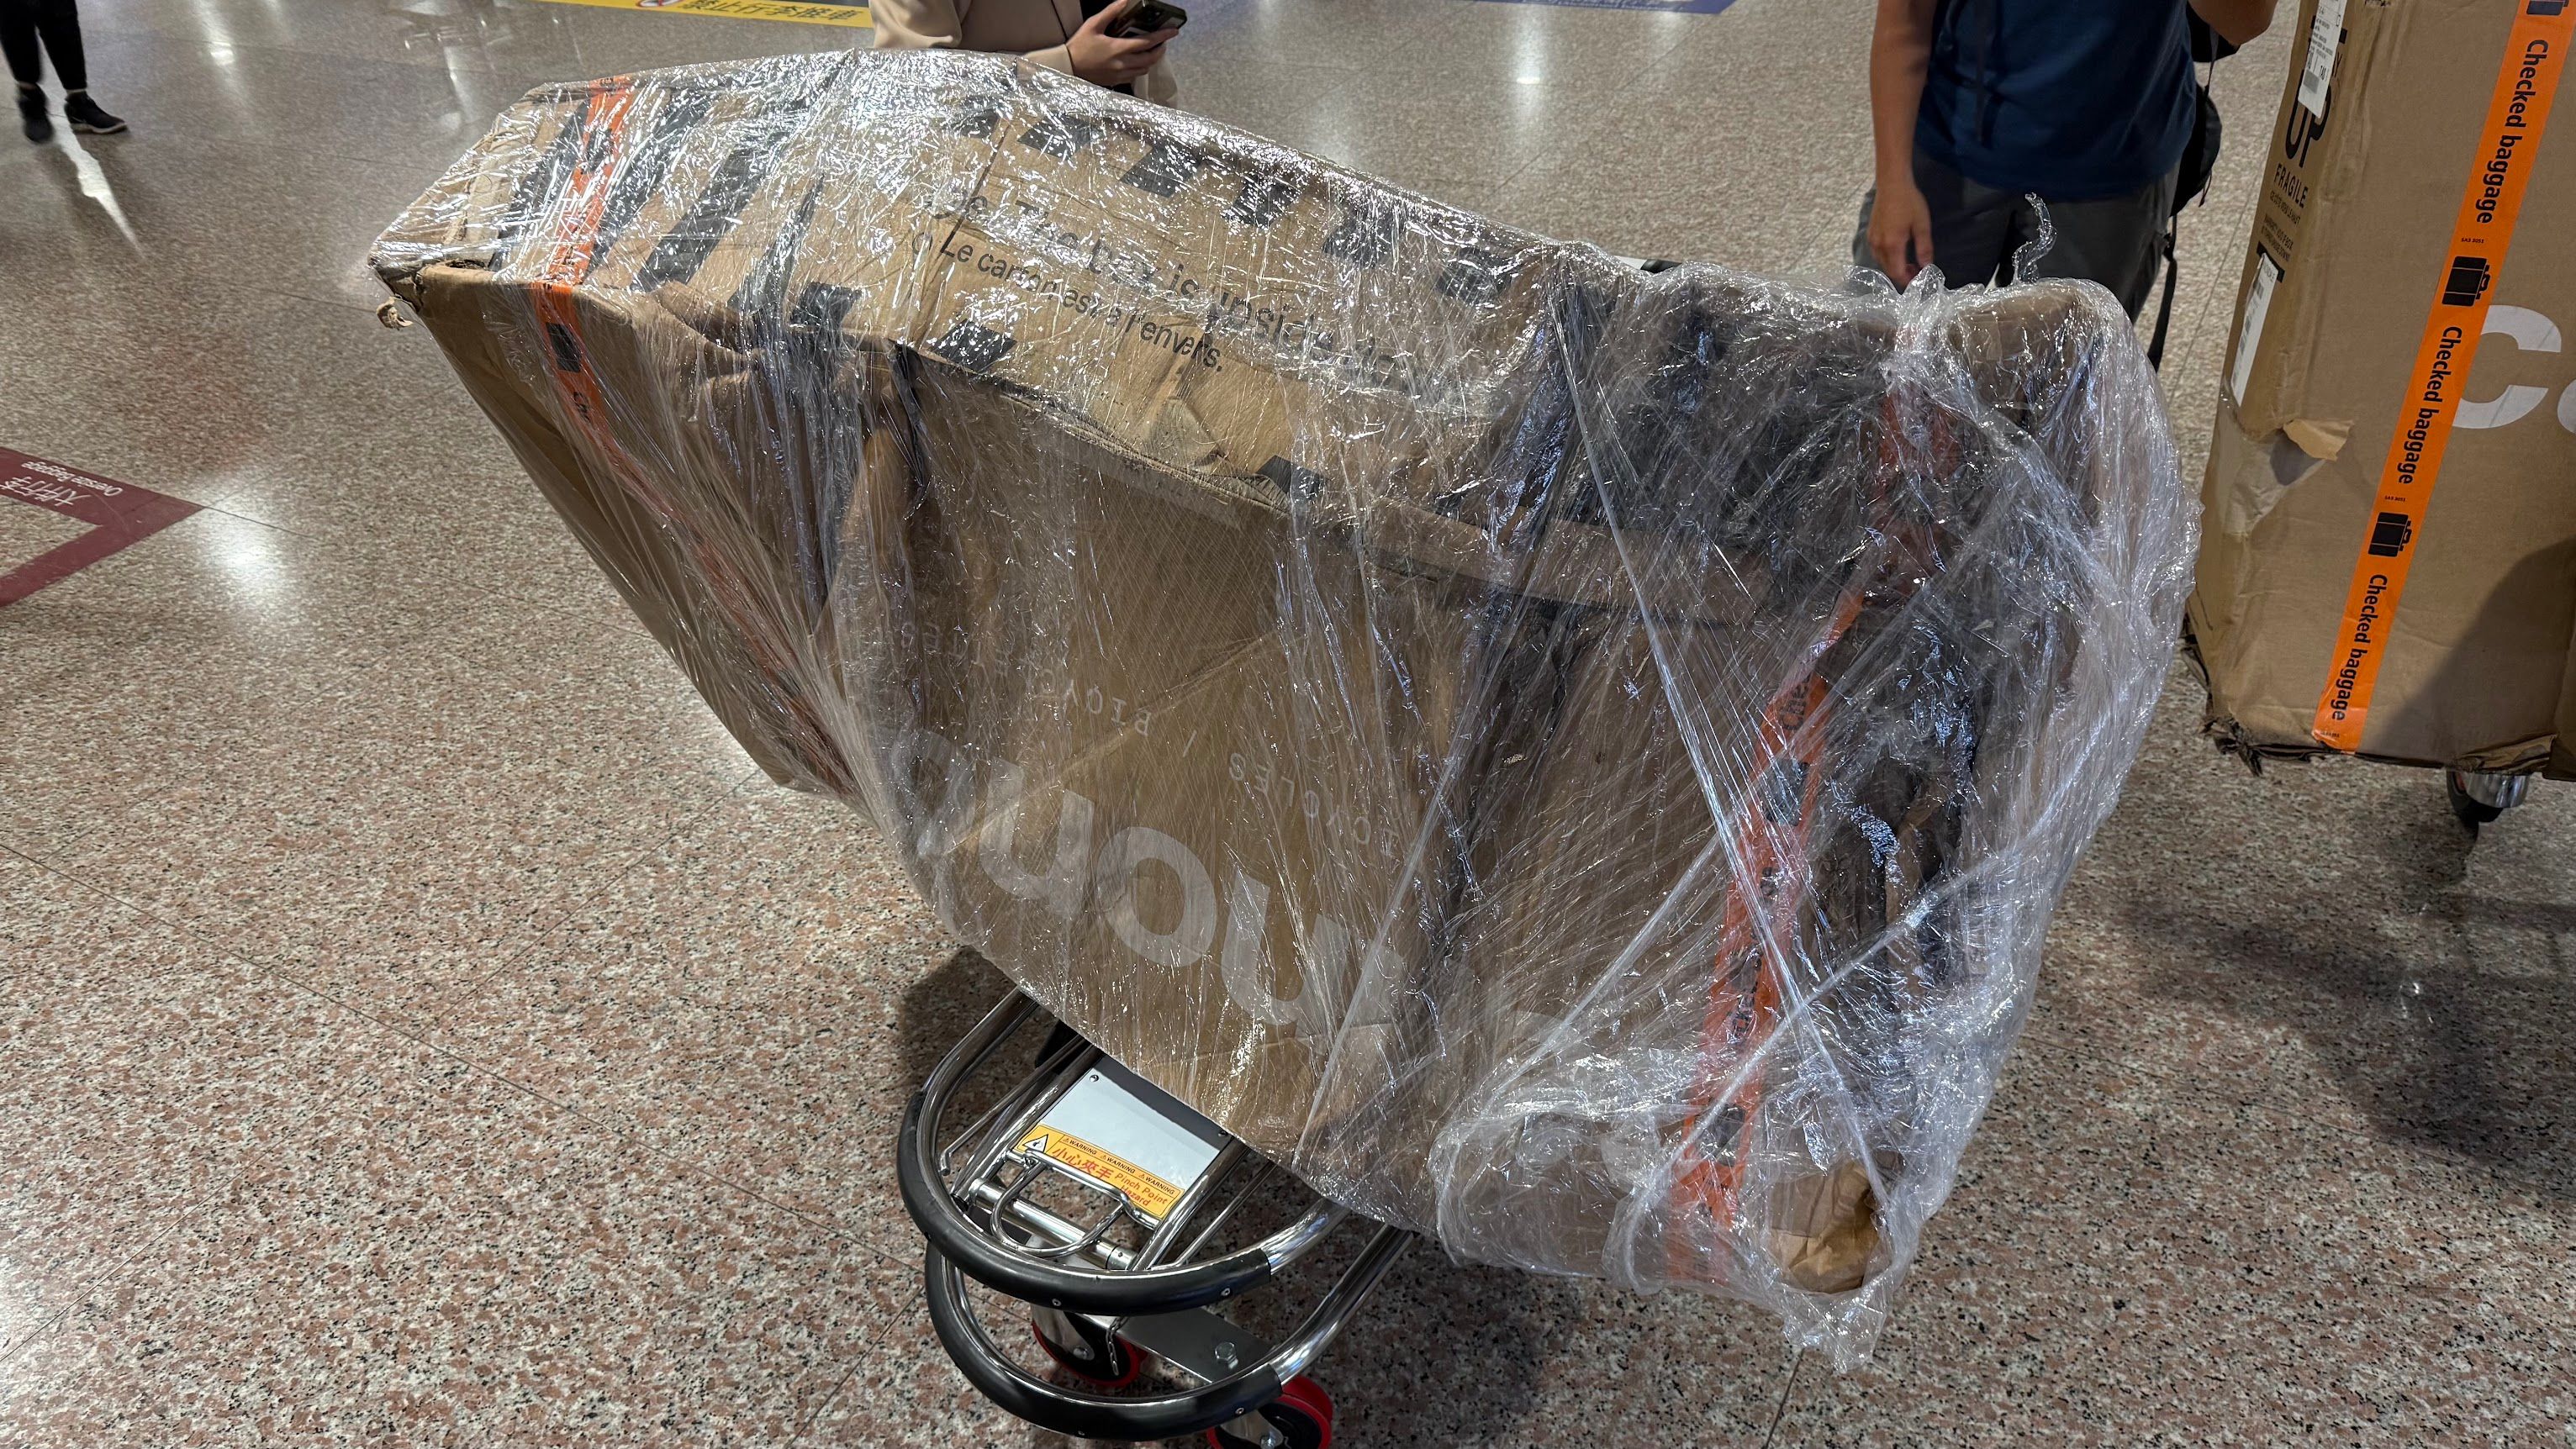
The clingfilm in the picture above was not present when I left Copenhagen; it must have been added at some stage to stop the previously-pristine cardboard from literally disintegrating enroute.
Clearly at some point during the journey to Taipei it had been left on the tarmac. In the rain. For an extended period.
Here’s how I pack my bike for air travel.
Table of Contents
- Who this guide is for
- A packing philosophy
- Protection outside of the box
- In case of emergency
- Conclusion
- Step-by-step guide
Who this guide is for
This method is probably more advanced than others you’ve seen. It assumes you will leave controls attached, which means you will need some extra cable slack, possibly having previously replaced the brake and shifter cables with longer routing for touring flexibility, e.g., in accommodating large handlebar rolls and bags.
The step-by-step instructions after the video mainly apply to a flat bar bike with disc brakes, rear rack, and a lot of gear, but the principles outlined beforehand are more universal.
A packing philosophy
The Frame Blob
Upon seeing the box now resembling a pretzel, I expected the bike to be similarly twisted inside. However, all bike components came out undamaged. The box didn’t save the bike, but I think my ‘Frame Blob’ packing method did.
Rather than attempting to add padding to protect everything individually, the bike components are protected by being tightly bound to the frame to avoid any errant movement. The goal is to end up with a bike box containing only a single frame ‘blob’, a rack ‘blob’, and one or two separate wheels.
You can achieve a frame blob by using reusable zip ties to:
- tie the fork to the frame triangle with the brake calliper nestled inside the triangle on one side;
- tie the handlebars with stem still attached on the other; and
- tie the crankset up into the top of the rear triangle, with arms facing the same direction and tied to the seat tube.
Each item is secured at 3 points with the zip ties to triangulate and prevent movement.
The Rack ‘n’ Pack Blob
Although my bike itself was fine, I discovered another pretty critical issue after unwrapping the clingfilm - my front handlebar bag, containing our tent inner and rainfly, was missing. The absence could be explained by a very large, ragged, handlebar-bag-sized hole in the soggy cardboard…
That’s when I learned absolutely nothing can be left loose in the box.
My solution since then is the Rack ‘n’ Pack Blob - basically, tying what’s left over that’s not directly attached to your frame into a separate blob, comprising my handlebar bag, rack, pedals, disc brakes, and helmet. This then fits in the box with the rack legs interleaved between the seat stays.
On padding
Don’t use traveling items like clothes or sleeping bags for padding - everything moves during transit and inspection, potentially damaging your gear or getting ejected through box damage. Some airlines also won’t accept boxes containing non-bike items.
I focus on damage from items moving and being ground together, rather than trying to guard against full crushing. The blob method prevents this better than padding. Where cardboard could maybe help is around spokes, but short of the box being stabbed, axles pressing on the sides of the box will take weight first if crushed.
Box or bag?
While the Reddit road warrior brigade was quick to respond to our sharing of the title image with “YOU DESERVE THIS YOU SHOULD NEVER FLY WITH YOUR BICYCLE IN A CARDBOARD BOX!!”, as bikepackers we know that flying with your bike in a cardboard box is usually the only realistic way to travel if you intend to depart from somewhere different from where you arrived.
When we are leaving from the same port we arrived in, we travel with Ground Effect Tardis bags. Theoretically these are supposed to help you avoid any additional bicycle carriage fees and just count as another item of checked luggage. Sometimes this doesn’t works, but fees and indivdual airlines aside (coming in separate article), it is definitely easier to travel with than a bicycle box.
Choosing a bicycle box
If you are riding one-way from the airport and have a large frame or burly expedition bike (like, say, an XL Tumbleweed Prospector 29er), then obtaining a mountain bike or even e-bike box is your best bet. E-bike boxes tend to be not only longer, but wider, which helps the wider wheels fit in side by side.
For a smaller frame, you can get away with leaving the back wheel on, whereas for mine, even with the longest and widest box, it usually needs to be removed. Besides this, the suggested packing steps are the same.
Protection outside of the box
Electric and acoustic tagging
I got my handlebar bag back in the end, but it wasn’t a tracker that saved me. An unrelated airline spotted the bag on the tarmac and emailed the address on the baggage tag1 - at a time when the carrier airline was still denying it was lost at all.
Take the time to add baggage tags to any separate internal bags, even if you have a tracker, and even if you need to hold off taping or re-open the box at the airport to do so.
I now also keep a Tile Tracker Pro in my handlebar bag. I prefer these to Apple Airtags because you can self-report “I am not a stalker” in the Tile app, meaning they will not automatically alert nearby people to their presence as with Airtags. This Airtag feature entirely undercuts their ability to act as a discreet theft tracker while touring.
I also keep a Scout Knog Bike Alarm and Finder screwed onto the bike frame, moderately hidden by the frame bag. Whilst it uses Airtag tech so as above is not great for live theft tracking, its use cases for me are tracking the bike blob during travel, and also providing a motion-sensitive bike alarm to startle casual thieves2.
Making the box easy to repack, and avoiding it being reopened at all
Another purpose of the blobs are that they should be able to be lifted out as single entities for inspection, and easily fit back into the box by airport staff.
Put sharp items and anything that emits vapors, like fuel bottles and camping stoves, in your separate checked bag that is easier to rifle through. If an x-ray satisfies officials, they won’t need to open the box.
Exception: TSA in America seem to always open bike boxes regardless of contents.
Good vibes?
Before we said farewell to our bikes, Tina wrote “Thank you for taking care of my bike!!!” in both English and Mandarin on her bike box, and drew some pictures of cute bunny rabbits.
I will note that her bicycle box came out on the other side spotless next to mine…
In case of emergency
I was worried that if I took off the clingfilm, the box would fall apart and we wouldn’t be able transport it. So we left and didn’t inspect the contents until three days later when it was time to build them.
By that time, we were three hours outside of the airline’s 72-hour missing baggage initial reporting window, and so the report went into a different system with a turnaround time of two weeks instead of two hours!
If something goes wrong and your bike arrives damaged, inspect the box immediately at the airport. Do not wait.
Conclusion
In the end, despite the total desctruction of its protective container, my bike was fine…well, with maybe just a few extra marks to give it ‘character’…
Be advised - this is not guidance for packing a carbon racing bike that you are concerned about scratching. Air travel is inherently tough on bikes, and to be honest my focus when packing my steel-framed bike is mainly on protecting the components, not so much perfectly preserving the finish. I haven’t had any major scratches because I remove my sharpest items and nothing can really rub against each other, but if I do get some I wouldn’t be devastated.
Here’s a full video to supplement and visually explain most of the step-by-step guide below. Happy bike packing!3
Step-by-step guide
If you prefer to follow an explicit step-by-step guide than getting the idea through the rougher video how-to, I’ve done my best below.
Tools
For each of these, the link is to the ones I currenty have on me and recommend.
Required
- Reusable zip ties
- small ziplock bag
- You’ll keep this with you while traveling; it will get dirty inside from bike grease. It carries the removed bolts while you’re traveling, and the zip ties while you’re cycling.
- a multitool that you’ve verified contains all size keys you need. I use a:
- Topeak Ratchet Rocket Lite DX for much faster build times; and a
- Topeak Hexus X Multi-tool multitool as backup, since I’ve broken a mini ratchet before.
- a small crank preload cap removal tool to remove your cranks
- A pedal wrench or (ideally if your pedals support it) a long-leverage 6mm hex key4.
Optional but recommended
-
Lightweight collapsible duffle/moving bag for second checked item
- They’re not as robust as a duffle bag, but they pack down small enough to tie up underneath the saddle, whilst holding nearly 90L! Carrying them with us permanently takes a lot of the stress out of both our air and bus travel.
-
Tile tracker Pro and Scout Knog Bike Alarm and Finder as previously mentioned.
The Frame Blob
- Remove the rear rack (large bike) or loosen off the seat stay attachments for the rear rack so you can swing the rack body in closer to the seat post (small bike).
- Loosen the brake levers, shifters, bell, and any other mounts on the handlebars, enabling them to rotate freely.
- Remove the pedals. Rather than differing clockwise/anti-clockwise references, it’s more intuitive to me to just remember that to Break the thread seal, you put the key or wrench facing up and move towards the Back of the bike. The same action applies on both sides.
- Take the chain off the sprockets, loosen off the two bolts holding the non-drive side crank, use the crank removal tool to unscrew and remove the remove cranks.
- Loosen the brake calliper on the front fork.
- If you have a derailleur and chain, take the chain off the sprockets, remove the derailleur from the frame by the hanger, tie another ziplock bag around it and as much chain as you can feed into it to keep both somewhat clean. Curl it around and zip tie it to the chain stay so that it’s mainly inside and protected by the rear triangle.
- If you have a Rohloff hub, you’ll also need to undo the external gear thumb screw and remove the gear box before removing the rear wheel.
- Lay the bike on its side, drivetrain side up, and remove the front and rear wheel. Put the skewers in your ziplock bag.
- If you have a belt drive, zip tie it to the chain stay (only a single side, don’t compress the belt together or kink it).
- Remove the handlebars including the stem: that is, remove the star nut, loosen the stem bolts, and slide the whole handlebar/stem assembly together off the steerer tube. This enables you to maintain your preferred handlebar angle when you put them back on the bike. The handlebar will still be connected to the main frame via the various cables.
- Slide the spacers, headset top cap, and top headset bearing off the steerer tube. Slide out the fork and remove the bottom headset bearing. Put these parts into a small ziplock bag.
- Before zip tying anything to the frame, you can store extra items in your full frame bag if you have one. Only my tent poles and pegs go in here; everything else goes in the moving bag that serves as my second checked item.
- You’ve now got an attached handlebar and fork hanging off the bike. Basically you’ll want to use reusable zip ties to tie the handlebar onto one side of the frame, and the fork on the other side.
- For the fork side, attach it so that the front disc calliper sits inside the frame and is protected by it. This will work with a full frame bag too so long as you loosen the bag off to give some give in this area.
- For the handlebar side, rotate the handlebar about such that you can minimize tension on the attached cables, and ziptie the handlebar at multiple points to prevent movement. Try to orient it so that the stem faces and is angled into the frame triangle gap, and then similarly rotate the brakes and shifters such that they are either flush with the frame bag or again protected within the frame triangle.
- At this stage, I usually put some cardboard around the front crankset sprocket, feed the pedal spindle through the top of the rear triangle and then reattach the loose crank and just lightly tighten the crank preload cap to hold it on - except with both cranks pointing in the same direction. You can then ziptie the crankset down at 3 points - crank arms to the seat stays through the pedal holes, and sprocket to the seat tube by poking a ziptie through the cardboard around it! This enables the bike frame to sit flat and flush with the bottom of the box, preventing sprocket damage and maximizing box space.
- You’ve now got a solid bike ‘blob’, with most critical parts flush with the bike and at least partially protected by the frame and space inside the triangle.
The Rack ‘n’ Pack Blob
- Wrap your pedals in cardboard, poke some holes through the card and ziptie your pedals up underneath the rack platform, diagonally at 2 points. The cardboard covers the pins, and tying them underneath the rack prevents them from coming into contact with the handlebar bag fabric and taking up extra space in the box.
- I also remove my disc brakes and zip tie them together onto the insides of the rack support ‘V’ struts. You may wish to put them in separate checked baggage or carry them in hand luggage to be extra careful, but I find the rack protects them well.
- Tie your handlebar bag to the top of your rack with voile straps, rok straps, whatever you use.
- Once you add the main frame blob into the box, you can see that if you push down on the back side of the bike, a large space appears in the bike box, which is where your second ‘blob’ will live. The whole ‘rack blob’ can then fit down over your rear triangle, with the legs either side of it or staggered in it.
- Finally, put the two bike wheels in either side of your head tube. You’ll need a wide box for this; if you’re struggling, you can tuck the wheels underneath the headtube so it rests in place, and then ziptie the headtube to the wheels to hold in place, but this adds complexity in packing and the potential for difficulty for people to replace items as they were after inspection. I prefer to instead find a box wide enough that anyone can just fit the 2 wheels and headtube side by side without any finagling or thought by those inspecting.
In an amazing turn of events, the police actually found the thief and we got everything back! The value of this item for this particular use case was thoroughly proved though, and we now always arm them.
Footnotes
-
They actually mistyped my email address, but at least had the right domain - which I had set up with a catch-all for any emails adressed to it. So doubly lucky there. ↩
-
We learnt this the hard way when our bike was ransacked of items from our smaller, permanently-attached bags in South Korea. A Scout would have scared the opportunistic thief away - and we already had them. We had just been lulled into complacency by the high safety we had felt in East Asia up to that point, and had neglected to arm them. ↩
-
I made it all the way to end without using this once. You’re welcome. ↩
-
A mad dash for a bike shop before it closed so I could free my stuck pedal threads, fit my bike in another box, and make another flight taught me that the 6mm hex that comes on your multitool will potentially be insufficient here. ↩


